
Add beam sensor
This page covers the device-specific wiring for a beam sensor (sender + receiver pair). For general device setup and activity settings, see Add device.
The beam sensor detects when something crosses a beam between a paired sender and receiver. Useful for monitoring intrusion across a defined line — companionways, gangways, dock access, or any space that should remain clear.
Uses a digital input slot (4–7) on the BRNKL connector.
The BRNKL 5G wiring is different from BRNKL Blue. The BRNKL 5G uses dry contact inputs — the white wire is pulled to ground when the beam breaks. The BRNKL Blue uses wet contact inputs — the white wire goes high. Using the Blue wiring method on the BRNKL 5G will apply DC voltage to a digital input and can damage the unit.
Prerequisites
Beam sensor sender + receiver pair
12–24 V DC unswitched power supply
Marine-grade wiring if extending the supplied leads
An available BRNKL digital input (slot 4, 5, 6, or 7)
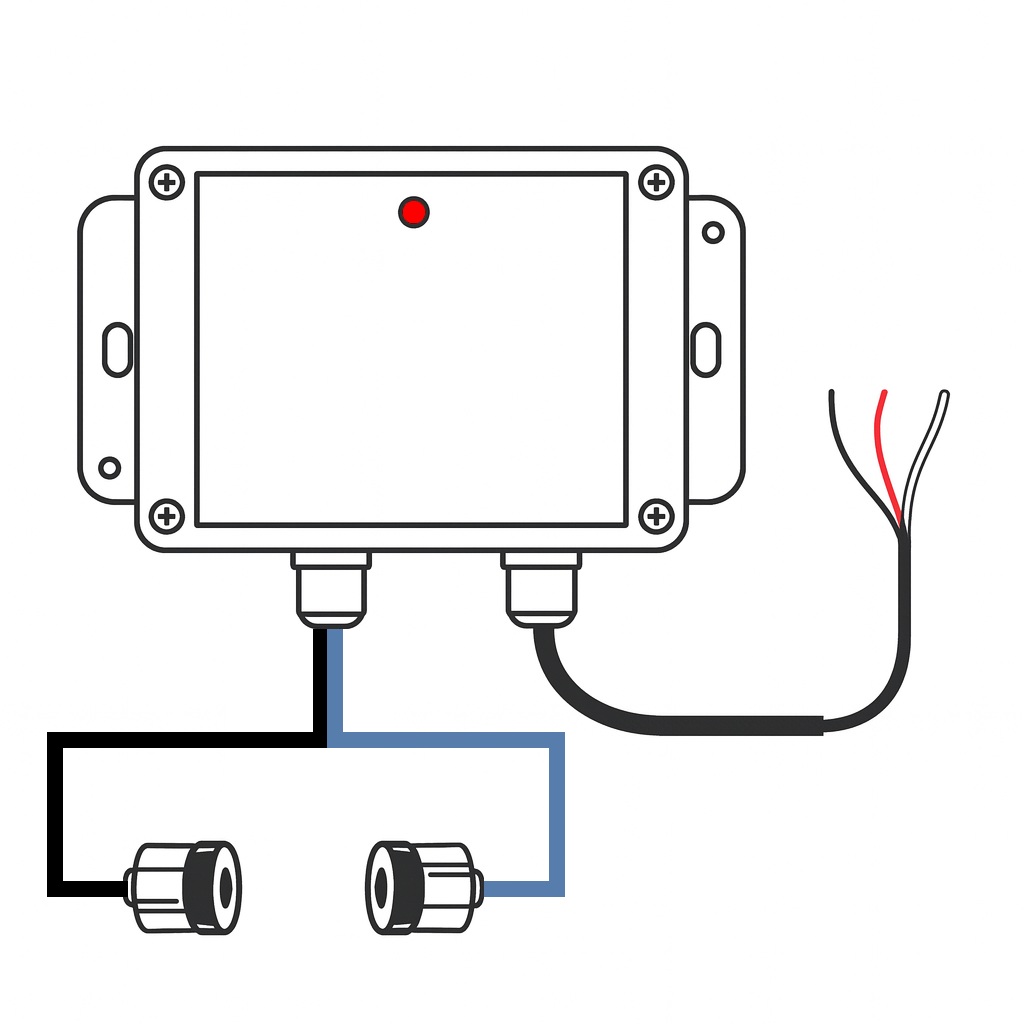
Wiring
Red wire → common ground
Black wire → 12–24 V DC supply (unswitched)
White wire → BRNKL connector digital input slot 4, 5, 6, or 7
When the beam breaks, the internal relay closes and pulls the white wire to ground, triggering the input.
Note which slot you use — you will need it when configuring.
If you need to extend the wiring, splice in marine-grade 18 AWG (or larger) wire. Ensure all splices are sealed and rated for the marine environment.
Mount sender and receiver
Align the sender and receiver so they face each other directly with a clear line of sight.
Maximum separation: 30 ft (≈ 9 m).
Secure each unit to prevent misalignment from vibration or movement.
During installation, monitor the LED on the sensor enclosure:
LED not blinking — beam is intact and aligned.
LED blinking — beam is broken (trigger condition).
Configure
In the BRNKL app, go to Settings > Devices and select the input matching your slot:
Slot | App setting |
|---|---|
4 | Digital 1 |
5 | Digital 2 |
6 | Digital 3 |
7 | Digital 4 |
This is a Digital input. Recommended settings:
Monitor — on
Alert — on
Name — e.g., Beam sensor or Gangway
High Name — Clear
Low Name — Triggered
Alert On — Low (alerts when beam is broken)
Tap Save.
Test
Wait 15 minutes for settings to sync.
With the beam unobstructed, confirm the LED is not blinking and the input shows Clear.
Pass an object or person through the beam path. The LED should blink and the BRNKL input channel should switch to Triggered.
If LED behaviour is inconsistent, fine-tune the alignment between sender and receiver.
Troubleshooting
LED stays blinking constantly — check alignment and ensure no obstructions or reflective surfaces are interfering with the beam path.
LED never blinks when obstructed — verify wiring (power, ground, and the white wire to the correct slot) and confirm the correct Digital input is enabled in the app.