
This page explains how to connect and configure a Maretron MPower CLMD12 or CLMD16 DC Load Module with your BRNKL system.
Prerequisites
Before connecting your Maretron MPower module to BRNKL:
-
The device must be pre-configured on the vessel using Maretron’s N2KAnalyzer.
-
This ensures that digital switch controls and inputs are set up correctly for your boat.
-
Configuration is normally performed by the boat manufacturer or a trained marine electrician.
1. Connect to the NMEA 2000 Network
Connect the Maretron module to the same NMEA 2000 network as your BRNKL system.
2. Open the BRNKL Device Manager
-
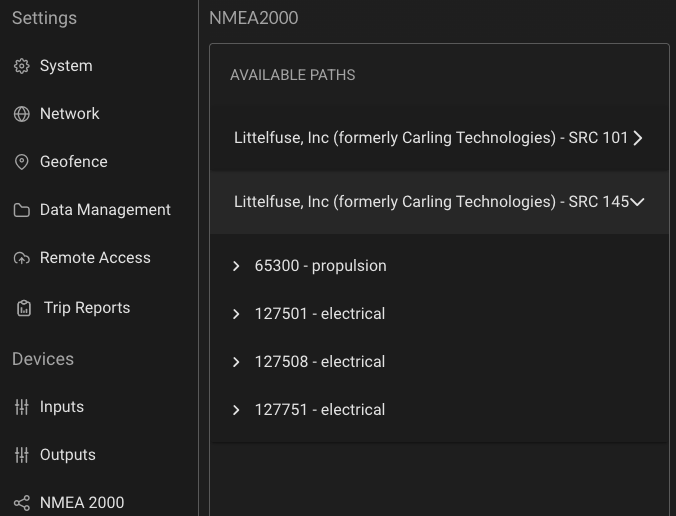
In BRNKL, navigate to Settings > NMEA 2000.
-
You may see multiple paths labelled Littlefuse, Inc or Maretron:
-
One for each bank of buttons
-
One for each bank of digital switches.
-
The Maretron module sends updates every 15 seconds, so the digital switches may take up to 15 seconds to appear.
3. Identify the correct module
-
Expand each LittleFuse, Inc. / Maretron path.
-
Look at the list of PGNs under the path:
-
PGN 127501 only → This is a button panel. It cannot be controlled.
-
PGN 127501 + PGN 127751 → This is the digital switching module that can be configured.
-
4. Configure digital switching module
-
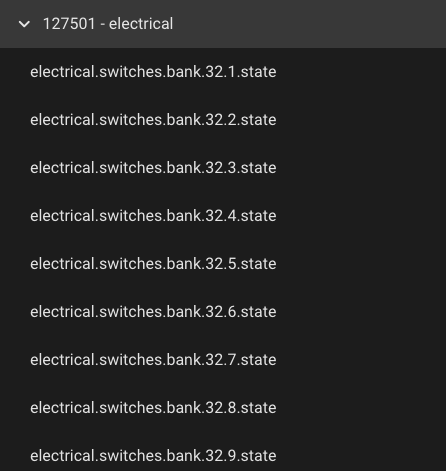
Expand PGN 127501 under the correct module path.
-
Endpoints follow this format:
-
electrical.switches.bank.xx.yy.state -
xx= the NMEA 2000 Device Instance.
-
yy = the Maretron switch number.
-
-
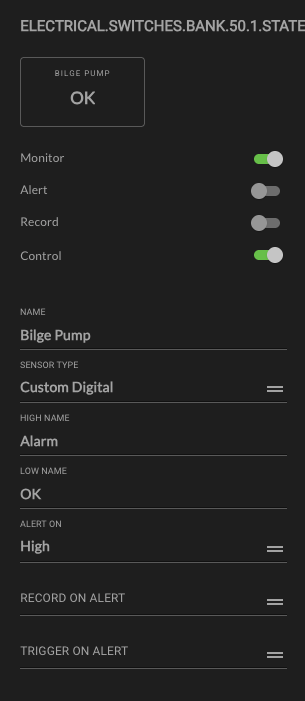
Rename desired switches to something meaningful (e.g., “Bilge Pump”, “Flood Light”).
-
Enable optional toggles that define how BRNKL views, alerts, records, and controls:
-
Monitor – Displays live switch status on your BRNKL dashboard.
-
Alert – Sends a push notification when the switch changes state while armed.
-
Critical Alert – Sends a push notification even if the system is disarmed.
-
Record – Logs each state change for history and diagnostics.
-
Control – Allows BRNKL to control the switch through the BRNKL Device Manager or the BRNKL App.
-
Sensor Type Options
When configuring a switch, assign the appropriate Sensor Type:
-
Bilge
-
For monitoring bilge pumps or float switches.
-
Helps detect leaks or excess water.
-
Pre-configured settings for optimized bilge alerts.
-
-
Shore Power
-
Monitors shore power connection status.
-
Ensures batteries are charging at dock.
-
Pre-configured settings for shore power loss alerts.
-
-
Security
-
For doors, hatches, or motion sensors connected via digital switch.
-
Triggers security alerts when the system is armed.
-
Pre-configured with security alert settings.
-
-
Custom Digital
-
General-purpose input for devices that don’t fit into predefined categories.
-
No pre-configured alerts — customize as needed.
-
Optional Features
-
Record on Alert – Triggers BRNKL to record video from selected cameras whenever this sensor triggers an alert.
-
Trigger on Alert – Activates linked devices when this sensor triggers (e.g., turn on lights, or sound siren).
5. Test Functionality
-
Monitor Test: Press the physical switch on the vessel and confirm the status updates in the BRNKL Device Manager or mobile app.
-
Control Test: In the Device Manager, go to Controls and toggle the switch on/off to confirm BRNKL can control it remotely.