
This page covers the device-specific steps for the Fibaro Smart Implant. For general pairing flow, prerequisites, and activity settings, see Add wireless device. For full product details, see the Fibaro manufacturer's page.
The Fibaro Smart Implant pairs with the BRNKL Blue to provide temperature probe monitoring. Once paired and the probe is enabled, temperature readings can be monitored, recorded, and used to trigger alerts or automations.
Pair temperature probe
-
Connect the device to power: red wire to +9–30 V DC, black wire to ground.
-
In BRNKL Device Manager, go to Settings > Wireless and click + Add Device.
-
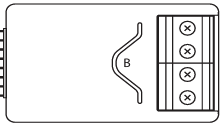
Open the enclosure to expose the small white device inside. Press the B button three times quickly. The LED will begin blinking yellow to indicate pairing mode.
-
When prompted, enter the PIN code printed on the device, then enter a descriptive name (e.g., Live Well Sensor or Fridge Temp Sensor).
Enable temperature probe
After pairing, the Fibaro Smart Implant shows an Air Temperature reading reflecting the ambient temperature inside the enclosure. The external temperature probe readings are displayed as separate endpoints (usually labelled Air Temperature (6), (7), or (8)).
If no additional temperature sensor reading appears click the sensor name, go to Advanced, and click Sync Now.
Remove temperature probe
-
Press the B button 3 times quickly to put the device into exclusion mode.
-
In BRNKL Device Manager, go to Settings > Wireless, select the device, and click – Remove.
Factory reset
-
Press and hold the B button until the LED glows yellow.
-
Quickly press the B button once more.
-
After a few seconds the LED will glow red, confirming the reset.